June 4, 2025
Posted by: Jase Graham
How to Create a Tab Over and Close the Female Rib on Metal Roofing Panels
In the realm of metal roofing, precision and efficiency are paramount. One critical aspect of ensuring a watertight and aesthetically pleasing installation is properly closing the female rib of a metal panel. This process, often referred to as creating a “tab over,” is essential for preventing moisture intrusion and achieving a seamless finish.
Understanding the Female Rib in Metal Roofing
Metal roofing panels typically feature interlocking seams known as male and female ribs. The male rib protrudes and fits into the corresponding female rib of the adjacent panel. Properly closing the female rib is crucial to secure the panels together and to prevent water ingress, especially in standing seam and snap-lock roofing systems.
The Importance of Creating a Tab Over
Creating a tab over involves bending the end of the panel to cover and close the female rib. This technique:
- Enhances Weather Resistance: By sealing the seam, it prevents water, snow, and debris from penetrating the roof system.
- Improves Structural Integrity: A closed seam adds strength to the panel connection, reducing the risk of panel separation under wind uplift.
- Provides a Clean Finish: It ensures a uniform appearance, which is particularly important for visible roof areas.
Tools Required for the Task
To efficiently create a tab over and close the female rib, the following tools are recommended:
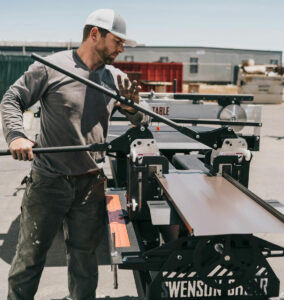
- SnapTable PRO: An all-in-one panel preparation system designed to notch, slit, and hem metal panels with precision.
- Seaming Tools: For mechanically seamed panels, a manual or powered seamer may be necessary.
- Hand Tools: Including snips, hemming tools, and rubber mallets for fine adjustments.
Step-by-Step Guide to Creating a Tab Over
- Measure and Mark: Determine the length of the tab required to cover the female rib, typically around 1 inch, and mark the panel accordingly.
- Notch the Panel: Using the SnapTable PRO, notch the sides of the panel at the marked location to facilitate a clean bend.
- Slit the Panel: Create a slit between the notches to allow the tab to fold over without interference.
- Hem the Tab: Bend the tab over the female rib using the hemming station on the SnapTable PRO, ensuring a tight and secure fit.
- Secure the Seam: For mechanically seamed panels, use a seaming tool to lock the seam. For snap-lock systems, ensure the tab clicks into place firmly.(Swenson Shear)
Tips for a Successful Installation
- Consistent Measurements: Maintain uniform tab lengths across all panels for a consistent appearance.
- Proper Tool Maintenance: Regularly inspect and maintain tools to ensure clean cuts and bends.
- Safety First: Always wear appropriate personal protective equipment (PPE) and follow safety protocols when handling metal panels and tools.
Conclusion
Mastering the technique of creating a tab over and closing the female rib is essential for any roofing professional aiming for high-quality, durable installations. Utilizing specialized tools like the SnapTable PRO can significantly enhance efficiency and precision, leading to better overall outcomes.
For more information on the SnapTable PRO and other innovative roofing tools, visit (snaptable page)
Note: Always refer to the specific manufacturer’s installation guidelines for the roofing system you are working with, as requirements may vary.
Explore Other Tools – https://swensonshear.com/sheet-metal-roofing-tools/
Apply for Financing HERE – https://swensonshear.com/financing/


