January 27, 2020
Posted by: Swenson Shear
Using a SnapTable PRO® for Installing Standing Seam Metal Roofs
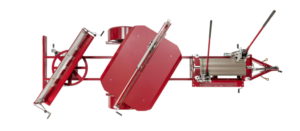
The SnapTable PRO is a towable, all-in-one standing seam panel preparation system that speeds up the process of cutting, notching, and hemming metal panels for standing seam metal roofing systems. Convert metal sheets to perfectly designed panels in minutes, saving valuable time and money on your standing seam metal roof installation.
This powerful do-it-yourself system is made up of 3 key components:
- Standing Seam Notcher: Designed to create perfect cuts through standing seam ribs with minimal physical effort, the Standing Seam Notcher can accommodate metal panels between 12″-24″. It can perform straight cuts or angles up to a 29″ offset, and it notches standing seam ribs on both male and female sides of the metal It notches the standing seam ribs on both male and female sides of the panel.
- Panel Cutter: Provides a clean, perfect straight edge cut across the flats of any standing seam metal panel, free of burrs. This cutting tool is designed for cutter lengths of up to 60″ and can rotate 360 degrees, and it features a dual edge blade which effectively doubles the blade life expectancy to thousands of cuts.
- Eave and Valley Hemmer: Use this tool to bend sheet metal roofing panels for standing seam roofing jobs without the need for pliers or snips. The Eave and Valley Hemmer features a rotating tabletop and adjustable teeth for evenness of pressure to provide consistently perfect lines on eaves, hips, and valleys.
How To Prepare Standing Seam Roof Panels with Swenson Shear’s SnapTable PRO
Here is a quick guide and instructional video for how to use your SnapTable PRO’s notcher, slitter, and hemmer to prepare panels for a metal new roof deck installation. For more in-depth instructions, troubleshooting, and FAQs, be sure to check out the SnapTable PRO Manual.
Notching standing seam metal roofing panels with a SnapTable PRO
Step One: Set the desired width of the standing seam roof panel.
To begin using your notcher for hips and valleys, you will first need to locate the T-Handle underneath the SnapTable PRO ruler. This T-Handle can be loosened and moved to your required position along the ruler. To determine the ruler position, we recommend referring to the SnapTable PRO Offset Chart, which provides an approximate starting point for calculating the correct angle for any given roof. This chart is offset in inches, so if you moved your notcher to the “16” mark, your notchers would be offset for a 16-inch miter cut. You can also easily adjust to the opposite angle — depending on which side of the roof you’re working on.
Step Two: Make sure your notchers are squared.
Your notchers come pre-squared from our shop, but every now and then, they may come loose and out of square due to vibrations from being transported to and from job sites. A straight-edge square can be used to re-square your notches. If your ruler is square in between the two notches that have been machined into the top of the notches, your notchers are square and you are ready to operate. Once the notchers are squared, lock notchers in place and adjust the ruler to zero out the notchers.
Step Three: Notch the standing seam panel.
After you set the correct width for your panel and make sure your notchers are squared, you are now ready to start notching. Here’s the step-by-step process for notching panels:
- Starting with the non-operator side, lower the notcher handle until you feel the dies ‘bite’ down on the panel. Do the same for the operator’s side until you feel it bite the panel.
- Both notchers should now be biting down on the panel. This will ensure the panel stays in place as it is notched.
- While on the non-operator’s side, bring the handle all the way down until it has cut fully through the metal panel. Next, switch over to the operator’s side and pull the handle until it cuts fully through the panel.
- With the notchers still in their closed positions, remove the coupons (the blank piece of rib that was notched out of the sidewall). If the “female” coupon sticks in the notcher, it may be necessary to raise the notcher 1-2″ and lower it again to loosen it.
- Return both notchers to the open position — your handles should be facing away from the operator’s side of the table — and move your panel down.
Slitting standing seam metal roofing panels with a SnapTable PRO
After notching, your standing seam roof panel is now ready to be slit!
Step One: Situate the panel in the slitter.
Situate the slitter blade on the side of the table opposite your position. Slide the notched panel down the table to the slitter, then adjust the slitter to the desired slope.
Step Two: Make the cut!
Pull the slitter across the metal panel slowly and smoothly. Trying to cut too fast may compromise the quality of cut. Always make sure you pull the slitter across the panel towards you — do not push the slitter blade across the panel.
Hemming standing seam panels with a SnapTable PRO
After you notch and slit your standing seam panel, you are now ready to hem. Here’s how to get the perfect hem with the SnapTable PRO:
Step One: Adjust the hemmer shoes.
Before you use the hemmer, you must first make any necessary adjustments to the shoes, which are situated across the entire length of the hemmer. Depending on the length of the hem you need, the shoes can be loosened, moved, and tightened with a 3/16 allen wrench to ensure there is even pressure across your panel before hemming.
Step Two: Hem the standing seam roof panel.
- Lift the operator handle at the top to allow the panel to hit the back of the fencing of the hemmer bar.
- Clamp panel by pulling the handle in a downward position until you feel it lock into place.
- Grab the rotating handle and move in a circular motion. The panel is now hemmed!
- To release the panel, unwind the rotating handle back into the original position. Then, slide the panel off the hemming die and move it forward through hemmer.
Need More Help With Your SnapTable PRO?
For more in-depth instruction on how to use your SnapTable PRO to prepare standing seam panels for a metal roof installation job, be sure to check out our Resources section for manuals, charts, catalogs, and brochures.
Why You Need a SnapTable PRO
Work with a SnapTable PRO for only a few minutes, and you’ll wonder how you ever got by without one! Here are a few reasons why this all-in-one tool is beloved by standing seam roof installers across America.
- All your essential tools in one place. The SnapTable PRO is designed to keep all the tools you need for new metal roof preparation contained in one easily towable workstation.
- Save valuable time on metal roof panel preparation process. Preparing metal panels by hand can be tedious, painstaking work, requiring a team of craftsmen to get it done right. The SnapTable PRO helps you cut, notch and hem standing seam panels in seconds, saving hours of time, and thereby cutting your roofing costs.
- Easy-to-use, single-person operation. No more teams required to prepare standing seam roofing panels–the SnapTable PRO is a one-person operation. It’s also so simple to use that you can assign the task of preparing and cutting panels to novice workers while allowing your skilled labor to focus on the actual installation process.
- Reliable results every time. SnapTable PRO delivers consistently perfect cuts, notches and hems, from the first panel to the last.
- Prepare panels at the job site. No more need to prepare panels offsite and haul them over. The SnapTable PRO can be easily towed to any job site, and it doesn’t require electricity, so it can be set up anywhere.
Don’t yet have a SnapTable PRO? Contact [email protected] or call (877) 588-8748 for a quote.
About Swenson Shear’s Metal Roofing Tools
Based in the USA, Swenson Shear is the #1 international provider of metal roofing tools for roofers specializing in metal roof installation for both commercial and residential applications. In addition to standing seam roofing tools, Swenson Shear also designs and manufactures roofing products and tools for exposed fastener roofs and stone coated shake and shingle roofs. Our exposed fastener tools include the Heavy Duty Pivot Shear and the Hip and Valley Roofing Shear, while our stone coat roof tools include the Stone Coat Cutter and the Base and Ridge Bender. Our tools work well with virtually all metal roofing materials, including Aluminum, Copper, Cor-Ten, Galvalume, Stainless Steel & Zinc, Nail Strip, SnapLock, Mechanical Seam, Zip-Rib, and many more options.


